Showing the current day's date, providing coupon expiration information, announcing the end of a sale; there's a plethora of reasons to add dates to an email. However it can be tedious to update one such line for every email send and can be even more difficult to maintain when doing so in an automated email. To solve for this we can use HubL to write small snippets of code to create dynamic dates. A dynamic date will automatically update depending on the day the email is sent and/or based on other defined criteria. So let's get started:
local_dt and format_datetime
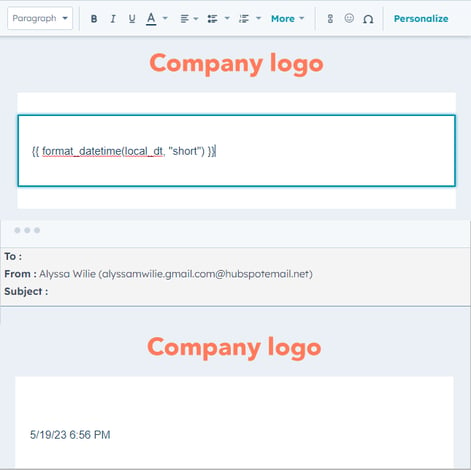
For dynamic dates there is a specific variable and function that you will need for just about any snippet you'll write. The variable local_dt outputs a datetime object of the current time in the time zone defined in your Account Defaults Settings. format_datetime (formally known as datetimeformat) is a function that will let us format that datetime object into something more readable. You can also use format_date or format_time if you're only interested in displaying one or the other.
The format functions have two required parameters—the datetime object you want to format and, of course, the format. There are four predefined formats you can use (short, medium, long, full) but you can also provide any custom format using Unicode Locale Data Markup Language. To show how the basics of this function works we'll start by outputting the simplest of dates, today's date, using the four predefined formats.
It's important to note that, by default, format_datetime outputs the time in UTC (Coordinated Universal Time). You can use the two optional parameters, time zone and locale, to localize your date/time output.
Time zone allows you to dictate the time zone of the outputted time by providing a name from the IANA (Internet Assigned Numbers Authority) timezone database. You can also use the local_time_zone variable to use your HubSpot accounts time zone setting. The example below shows an output using my local_time_zone (America/Chicago) and Asia/Tokyo.
Locale sets a specific locale to use. In the following example we'll change the locale to 'es' to change the language to Spanish.
plus_time and minus_time
Next let's dive into showing dates in the future and in the past. To do this we can use either of the two filters, plus_time and minus_time. Each of these filters has only two parameters—the amount you want to add/subtract and the unit you want to add/subtract by. There are 15 different units, but in email you're most likely to use days, weeks, months, and years. Below are a few examples using these filters. Note that the filter should be used on the time variable and not the whole function.
Advanced Dates
We've learned the basic variables, functions, and filters for writing dynamic dates so next is learning to use these in more advanced use cases. For instance, what if we only want to show business days and skip over weekends when outputting a date in the future? Or maybe instead of exactly two weeks ahead, we want to output twoThursdays ahead.
Business Days
To only output business days we'll start with creating a couple of variables: day_increase will default to how many days we originally want to go into the future by and date_weekday will get the weekday that the original increase falls on. We can use the EEEE unicode format to get the weekday.
We'll then run an if else statement to check if date_weekday falls on a Saturday or Sunday. If it falls on a Saturday, we'll add 2 to our day_increase variable. If it falls on a Sunday we'll only add 1 to our day_increase variable.
Then we only need to output our date using day_increase as our amount variable for plus_time.
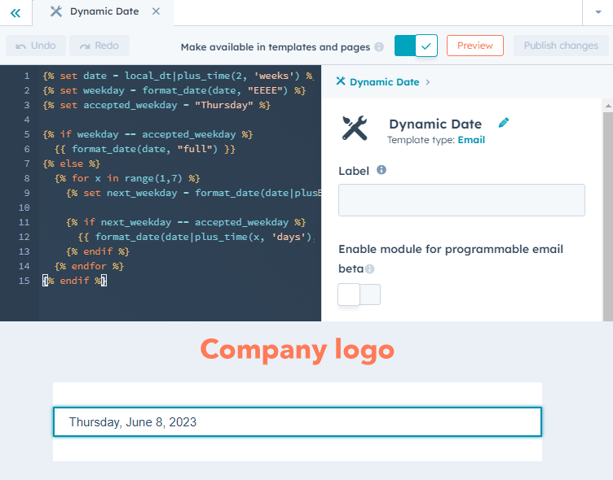
Weekday Specific
To get a specific weekday will involve just a little more footwork. We'll start it off by setting a few key variables: date will be our original future date, weekday will be the weekday that date lands on, and accepted_weekday will be the weekday we require our future date to land on.
Similar to looking for business days we'll then set up an in if else statement. If weekday is the same as accepted_weekday we'll go ahead and output our formatted date variable.
If weekday isn't the weekday we want though we'll then move into our else statement where we'll run through a for loop. Since are accepted weekday will be within the next 6 days we'll run the for loop through a range of 1 to 6 to find the nearest day from our date that matches our accepted_weekday. In the for loop we'll create a next_weekday variable to set the future weekday using x from our loop. Then we'll check if next_weekday matches our accepted_weekday and, if it does, we'll output that day as our formatted date.
And so the above will only ever show a Thursday date!
Add Your Dynamic Date to Your Email
Now at the end of all this you've learned you may be asking "now where do I put this code?" You have a couple of options actually. If you're just outputting a basic date with minimal code you can drop it right into the text of your email. It'll show up as code in the email editor, but in the email preview and sent emails it'll show the rendered date.
For more complex code, like mentioned in the advanced section, it may be more intuitive to create a custom module in the Design Manager. You can create a module specifically just to house your dynamic date code or code out the entire section you're using the date in. Also, if you're building a custom coded template, instead of using HubSpot's drag-and-drop email, you can place the code directly in the template. Putting your code in a module or template will render it in the email editor exactly as it'll appear in the email.
Formatting Personalization Tokens
In some use cases you may want to output a date from a contact's data in HubSpot. However, it's not possible to use filters and functions on personalization tokens in basic emails. You would need to have a subscription tier that includes the programmable emails beta to be able to mutate personalization tokens. If you do have the programmable emails beta—you won't be able to mutate tokens directly in the email, but you can make email modules with this capability by flipping on the programmable email switch.
With the help of dynamic dates you can now more easily set and forget your automated emails or even save time when manually sending emails from a template with predefined content.