When building out a custom module sometimes there will be fields that won't always be needed. Usually these are fields dependent on other fields.
This could be as simple as a couple of settings for a heading that are only needed if the heading field isn't empty. Or it could be more complex, like whole groups of fields that are only needed when a particular choice from a choice field, or multiple fields, is chosen.
Being able to show certain fields based on certain criteria not only keeps the field list tidy on the front-end but will also make the module easier to understand for users. So, how can we conditionally display fields in HubSpot modules?
Display Conditions in the Design Manager
If you're working directly in HubSpot's Design Manager, each field will have a Display conditions section in the right hand sidebar. This is where you can apply some basic criteria for when a field should be visible. A condition has 3 properties—a controlling field, operator, and value.
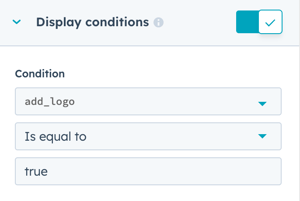
Controlling Field
The controlling field is the field you want your conditional field to be dependent on. If the field you choose as your control has multiple properties to it you'll be given a fourth optional property—property.
The property field lets you choose a specific property from your controlling field for the condition.
For example, if you have an image field wherein you want your conditional field to be dependent on if an image has been chosen, you will want the src property of the image field to be your control.
In this example, if you didn't choose a property as your control, the condition would always be true. This is because the image field as a whole technically always exists, whereas it's the src property that doesn't always have a value.
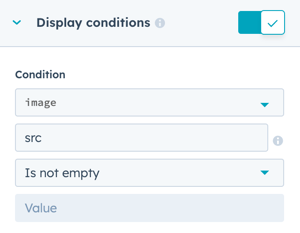
Operator
The operator is how the condition should be met and includes 5 options:
- Is equal to
- Is not equal to
- Is empty
- Is not empty
- Custom regex
The first 4 are pretty self explanatory; checking wether the controlling field is equal to the value or not, or whether it's empty or not. "Custom regex" though may not sound familiar.
"Custom regex" allows you to add regular expressions, also known as regex, to the control value. Regular expressions are patterns used to match character combinations in strings. This can allow for slightly more complex conditioning; such as if the value starts or ends with a certain string of characters, if the value matches this or that, if the value doesn't have a number in it, etc.
Value
Lastly, unless you've chosen "Is empty" or "Is not empty" as your operator, you must provide a value for the operator to match against. For example, if your controlling field is a boolean the value would either be true or false and for a choice field you'd likely be checking for one of the options you've provided.
Field Visibility in Local Development
Display conditions is referred to a little differently in local development . Simple display conditions are set up as logic within a visibility object in the field. Like in the Design Manager, there are 4 properties to be aware of:
- controlling_field_path
- operator
- controlling_value_regex
- property
These all have the same function as their counterparts in the Design Manager, however the values provided for the operator are different from what you'd see in the Design Manager.
When building in local development the following are the accepted values for the visibility operator:
- EMPTY
- NOT_EMPTY
- NOT_EQUAL
- EQUAL
- MATCHES_REGEX
Advanced Visibility
Beyond what's capable in the Design Manager, local development gives us the option of creating advanced visibility rules. Basically, we're able to add multiple rules rather than just the one.
So if we want a field's display condition to be based on multiple fields, with different operators and values, we can use advanced visibility to do so.
To add advanced visibility to your field you first have to add the visibility_rules property and set it as ADVANCED. This lets the field know to use advanced visibility rather than the simple visibility.
Next we add the advanced_visibility object. In this object there are 2 new required properties—boolean_operator and criteria.
boolean_operator is the operator to use between our multiple rules. We can set it to require all rules be met by using AND or set it to only require one rule be met by using OR.
Then the property criteria is simply the array we'll place all of our rules into.
The above example only shows two rules, but with advanced_visibility you can add as many rules as is needed to create the perfect conditions for your field to display.
Now, with visibility and advanced_visibility in your pocket, you can create modules that respond to user input. This will make your modules more intuitive to your users and less cluttered on the front-end.